Documentation
Cross-Sites Shared Elements
Managing multiple websites can be a daunting task, especially when it comes to maintaining consistency across different platforms. Keeping elements like headers, footers, banners, and styling uniform requires considerable effort and meticulous attention to detail. This is where our new feature, Cross-Sites Shared Elements, steps in to transform the way you manage and maintain your websites.
Solving the Problem of Consistency and Maintenance
Traditionally, making updates to shared elements across multiple sites involves updating each site individually. This process is not only time-consuming but also prone to errors, leading to inconsistencies that can harm your brand's image. Cross-Site Shared Elements addresses this challenge by allowing you to create a page element in one place and reuse it across multiple sites. Any changes made to this element will automatically update across all sites where it is used, ensuring consistency and significantly reducing maintenance time.
Ideal Use Cases
- Brand Consistency Across Multiple Sites: If you manage multiple websites for your brand, maintaining a consistent look and feel is crucial. RebelMouse’s Cross-Site Shared Elements ensures that any changes to shared elements like logos, headers, and footers are reflected across all sites instantaneously.
- Centralized Control: Clients handling multiple sites can manage shared elements from a single dashboard. This feature is particularly beneficial for updating promotional banners, announcements, or seasonal themes.
Benefits of Cross-Site Shared Elements
- Efficiency: Make updates once and see them reflected everywhere, saving time and reducing the workload.
- Consistency: Ensure a uniform appearance and functionality across all your websites, strengthening your brand's identity.
- Simplicity: Manage and maintain elements from a single location, simplifying the content management process.
How It Works: Step-by-Step Setup
Using the Cross-Site Shared Elements feature is straightforward. Follow these steps to start leveraging this powerful feature:
Step 1: Define the source-of-truth site
- Define which site you’ll use as the source-of-truth and where the global shared elements will be managed - Let’s call it Site 1 in our demo.
Step 2: Cross-site access

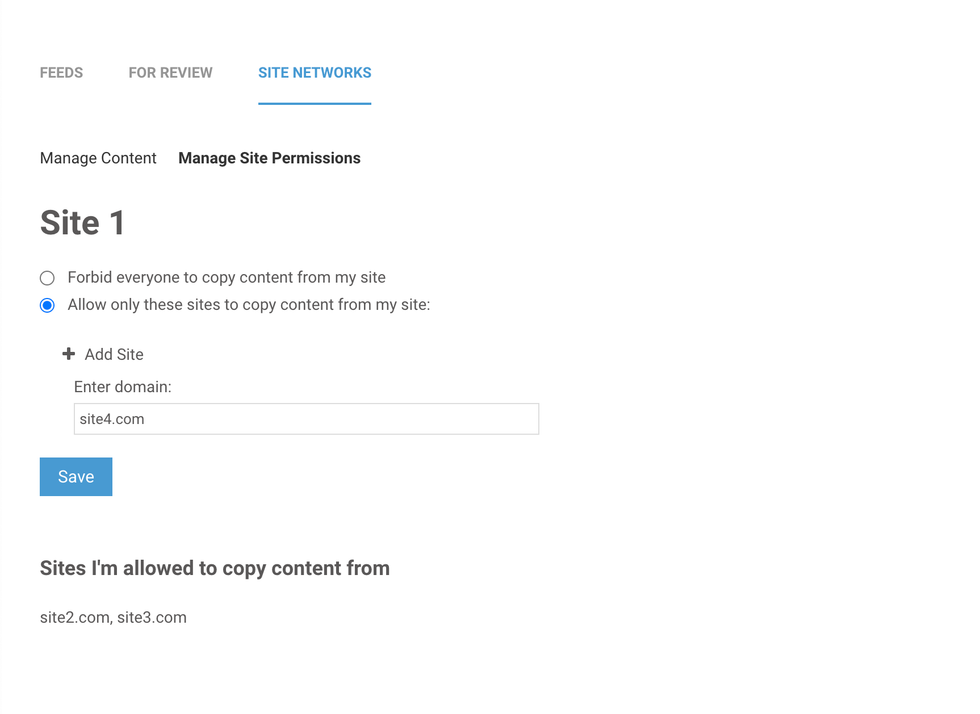
- Navigate to the content feeds → Site Networks of Site 1 by accessing this path: /core/dashboard/content_feeds/site_network#manage_permissions
- Enable the other sites to copy content from the Site 1 by:
- Selecting “Allow only these sites to copy content from my site:”
- Adding the domains one by one and clicking Save - for our example, I gave access to Site 2, Site 3 and Site 4 to copy content from Site 1
Step 3: Create your global shared elements

- Navigate to the L&D of the Site 1 where the global shared elements are managed.
- Create a new shared element and give it a name. Note: Use one word or underscores between words, not spaces. For example:
globalfooterGlobal_FooterJune_Promo_Banner
- Use the extensive elements our L&D has to offer and build the element you need
Step 4: Access Shared Elements on Other Sites

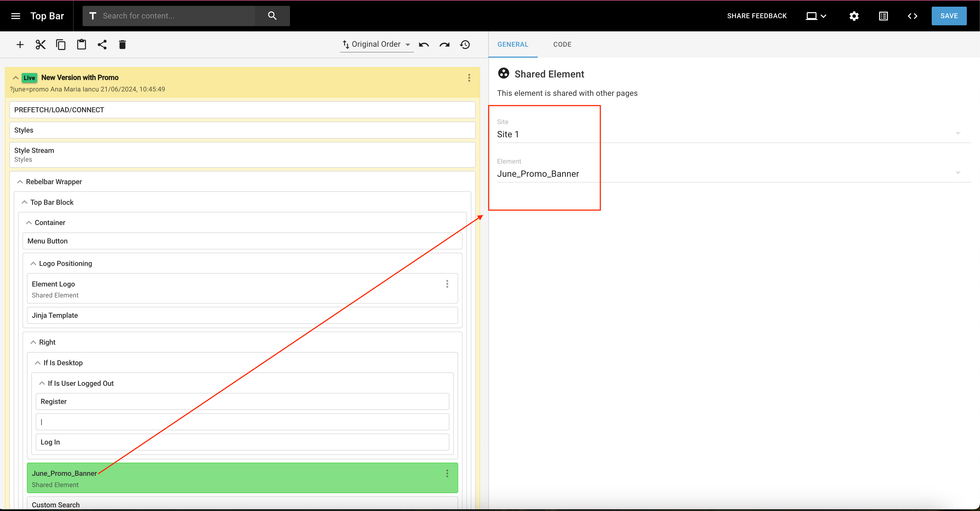
- On any site where you want to use that global shared element, go to the Layout & Design tool. In my example, I want to use the new global shared element on my Site 2
- Select "Shared Element" from the options.
- One the right side you’ll see 2 options, to select the Site and the Shared Element
- Choose Site > Site 1 (in my case), you will select the original site where you created the global elements
- Select the shared element you want to use, in my example I will select
June_Promo_Banner
Step 5: Verify on Frontend

- Check the page on the frontend to ensure the selected cross-site shared element is rendering as expected.
Step 6: A/B Testing with Shared Elements

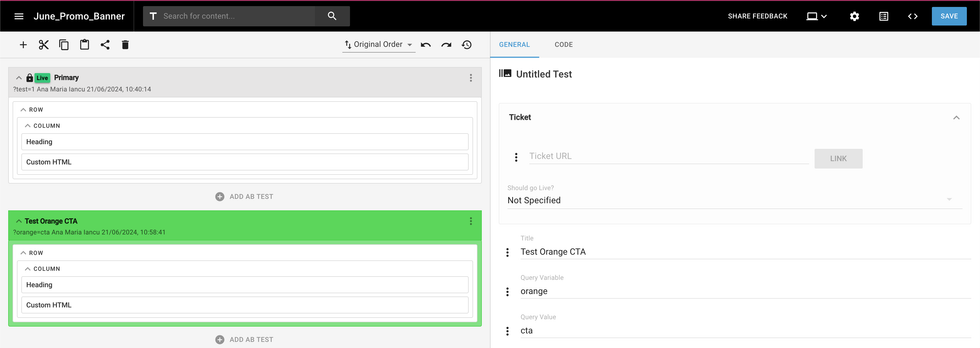
- For testing new versions of the element, you can create a new b-test normally in the L&D of site 1.
- Check the new version on other sites using the same parameters set in the site 1.
Site 1 b-test Setup:
Site 2 b-test display:

RebelMouse’s Cross-Site Shared Elements is a game-changer for anyone managing multiple websites. It simplifies the process of maintaining consistency, saves valuable time, and ensures your brand remains uniform across all platforms. By centralizing control and streamlining updates, this feature empowers you to focus on what truly matters – creating great content and enhancing user experience.
Table of Contents
- Solving the Problem of Consistency and Maintenance
- Ideal Use Cases
- Benefits of Cross-Site Shared Elements
- How It Works: Step-by-Step Setup
- Step 1: Define the source-of-truth site
- Step 2: Cross-site access
- Step 3: Create your global shared elements
- Step 4: Access Shared Elements on Other Sites
- Step 5: Verify on Frontend
- Step 6: A/B Testing with Shared Elements
- Site 2 b-test display: