RebelMouse has introduced a streamlined feature that enables a seamless single sign-on (SSO) integration between RebelMouse, an OAuth client such as Sharetribe, and an OpenID provider such as Google OAuth. In this setup, RebelMouse functions as the identity provider (IdP) that handles user authentication, while the OAuth client acts as the consumer of the authentication data. The integration ensures that users logging in via RebelMouse are authenticated across both the RebelMouse and OAuth systems, offering a unified and secure login experience.
Key Features
- RebelMouse serves as the IdP, managing user authentication.
- User session information is shared across RebelMouse and the OAuth client application.
- User data, including user ID, first name, last name, and email address, is passed securely to the OAuth application for user authentication.
Integration Flow
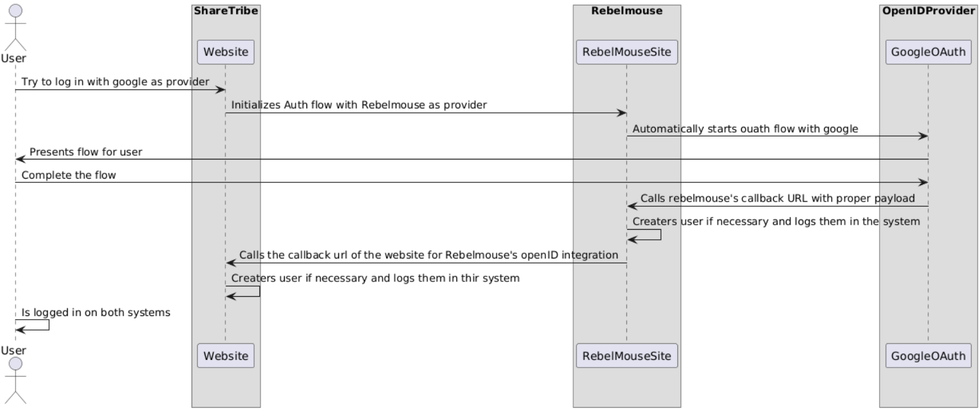
1. User Initiates Login
The user attempts to log in to the OAuth client using Google as the identity provider.
- Action: The OAuth client initializes the authentication flow by requesting that RebelMouse authenticates the user.
2. Authentication Flow Goes Through RebelMouse
Once the authentication request has been received, RebelMouse begins the OAuth flow using Google as the OpenID provider.
Action: RebelMouse automatically initiates the OAuth process with Google, redirecting the user to Google's login page.3. User Completes Authentication Through Google
The user completes the login process on Google's OAuth page.
- Action: Once authenticated by Google, the OAuth client sends a callback request to RebelMouse's designated URL with the necessary user information payload.
4. RebelMouse Creates a User/Logs the User In
RebelMouse processes the callback and verifies the user’s details. If the user doesn't exist in RebelMouse, they are created and then logged in.
- Action: RebelMouse creates the user if needed, and establishes a session for them.
5. Session Shared With the OAuth Application
RebelMouse passes the authenticated user data (user ID, first name, last name, email address) to the OAuth client, ensuring the user is logged in on both systems.
- Action: The OAuth client processes the user’s details and creates a corresponding session on its platform.
6. Successful Login
The user is now authenticated on both RebelMouse and the OAuth client and can continue their session seamlessly.
Data Flow Details
During the authentication process, the following user data is securely shared between RebelMouse and the OAuth client:
- User ID: The unique identifier for the user in RebelMouse.
- First Name: The user's first name as provided during Google’s OAuth authentication.
- Last Name: The user's last name as provided during Google’s OAuth authentication.
- Email: The user's email address registered with Google.
This data ensures that the OAuth client can recognize the user and manage the session accordingly.
Client Backend Adjustments
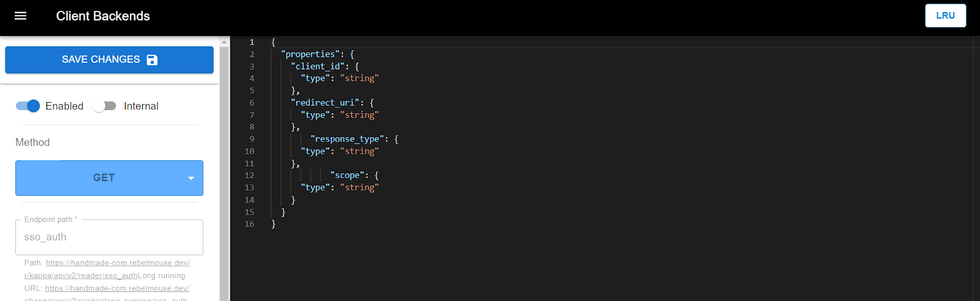
We currently support the standard OAuth 2.0 flow, including OpenID Connect (OIDC). However, certain OAuth providers may request specific scopes or grant types that are not supported by our platform. In such cases, Client Backends can serve as a bridge, adjusting the requests sent by the OAuth provider to align with our supported flows and scopes.
For example, some OAuth 2.0 providers may require specific scopes or grants that our system does not support. Client Backends can intercept these requests, translate them into the scopes or grants that we do support, and then forward them accordingly. Essentially, it acts as a bridge to modify the data exchange. However, it's worth noting that the use of Client Backends is rare and only necessary when adjustments are required.
In the following example, you can see how data is modified during the authorization process. The script converts unsupported scopes into those that are supported by our system and redirects the user to the appropriate URL for continued processing.
The Grants We Currently Support
- implicit
- authorisation_code
- password
- refresh_token
- openid_code
The Scopes We Currently Support
- profile
Configure OAuth 2.0 per Site
The following table outlines essential OAuth fields, their descriptions, and their purpose(s) to help guide the setup and understanding of an OAuth-based integration. The details outlined are required for our team to enable this feature. Each field plays a crucial role in ensuring a smooth and secure SSO integration process between RebelMouse, the OAuth client, and the OpenID provider.
Field | Description | Purpose |
Client ID | A unique identifier assigned to your application by the OAuth provider (e.g., Google, Facebook) when you register your app. It is used to identify the app making the OAuth request. This is something that has to be unique. It can be generated using tools such as UUIDv7. | This helps the OAuth provider know which application is requesting access to the site. |
Client Secret | A secret key assigned to your application by the OAuth provider. It is used alongside the Client ID to authenticate the app during the OAuth workflow. This can be generated using tools such as SHA256. | The Client Secret is required to keep communication secure between the app and the OAuth provider. It should never be exposed to the public or embedded in client-side code. |
Client Name | The name of your application or service as it will appear to end users during the OAuth authorization process. | This name helps users recognize your application when they are prompted to grant permissions. |
Redirect URIs | A list of URLs that the OAuth provider can redirect to after the user grants or denies permission to your app. These are endpoints on your application where the OAuth provider sends authorization codes or tokens. This field should be comma separated in Django Admin. | These URIs ensure that the tokens or authorization codes are sent to the right place. The redirect URIs must match exactly with what you register with the OAuth provider and OAuth consumer. |
Default Redirect URI | The default URI to which the OAuth provider will redirect users to if no specific redirect URI is provided during the OAuth request. | This serves as a fallback in case the request does not explicitly define a redirect URI. |
Scope | Defines the specific permissions your app is requesting from the user (e.g., "read" for GitHub or “email” for us). This is a space-separated list of permissions that determine the level of access your app requires. | The Scope determines what kind of access the user will be granting to your app (e.g., read-only access, full access to resources, email only, profile user information only). |
Response Type | The type of response expected from the OAuth provider. Common values include:
| This tells the OAuth provider what type of credential you are requesting. Typically, code is used to request an authorization code that is exchanged for a token. |
Interested in learning more about how RebelMouse supports single sign-on? Contact your account manager or reach out to support@rebelmouse.com today.
Not currently on RebelMouse? Get in touch to streamline your user experience and deliver a better website to your audiences across every touchpoint.
Table of Contents
- Key Features
- Integration Flow
- 1. User Initiates Login
- 2. Authentication Flow Goes Through RebelMouse
- 3. User Completes Authentication Through Google
- 4. RebelMouse Creates a User/Logs the User In
- 5. Session Shared With the OAuth Application
- 6. Successful Login
- Data Flow Details
- Client Backend Adjustments
- The Grants We Currently Support
- The Scopes We Currently Support
- Configure OAuth 2.0 per Site


© 2025 RebelMouse. All rights reserved.
Comments Moderation Tools